


Let’s take a look at how Portal can be used to interact with individual nodes.
This exercise will have the SN132 SNAPstick running the example script “HolidayBlink,” and the SN171 protoboard running another example script, “HolidayLightShow”.
Until now we have ignored the SNAPpy (pun intended) little Synapse screwdriver and small bag of electronic components that accompanied the kit. Now is the time to roll up our sleeves and get to work on a second demonstration.
Demonstration 2 uses Portal, our wireless application development environment. Portal supports a fast, real-time view of your SNAP network, configuration and monitoring of your devices, a channel analyzer, data and event logging, and more.
Portal isn’t necessary for a SNAP application to run, but it can be a lot of help during development. Let’s use it to take a look at how sensors allow nodes to interact with Portal and each other.
If you haven't downloaded and installed Portal yet, you should do that now. Make sure the SN132 SNAPstick is not plugged in to a USB port on the PC that will run Portal, then download Portal from: http://help.synapse-wireless.com/Portal/Portal-setup-2.7.1.exe
Once it’s downloaded, double-click the file to start the install process and follow the on-screen instructions. When installation is complete, plug the SN132 SNAPstick into a USB port on the PC that will run Portal, launch Portal, and we’ll get started.
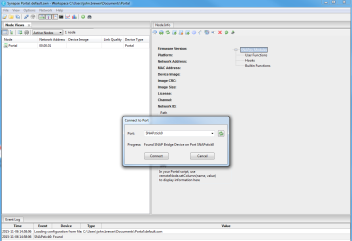 Starting Portal for the first time displays a blank network configuration and a dialog asking what port to use to connect to the SNAP bridge device:
We’ll use the SN132 SNAPstick, so make sure it’s connected to the USB port.
Press Connect once the bridge device (SN132 SNAPstick) is detected. (This is probably going to be USB0.)
Portal is pretty straightforward to use, so we’re not going to delve too deeply into how it’s used outside of the context of the exercise we’re about to perform. If you’d like to get a full introduction to the software, it’s available in the Portal User Guide at: http://help.synapse-wireless.com/Portal/Portal-Reference-Manual.pdf.
Key Concept
The Portal PC (the PC that the Portal software is running on) has no 802.15.4 radio of its own. One of the SNAP nodes must act as a “bridge” for it. Portal connects serially to this bridge node, using either a USB or RS232 connection.
Portal is then able to communicate to the rest of the SNAP nodes by sending packets across the connected bridge node. In this case, the SN132 SNAPstick is acting as the bridge.
We first need to look at the Node Views tabbed window. If this window is not already open, you can click Views, then choose Node Views window. Alternatively, you can click the icon on the toolbar.
![]() You will notice that the Node Views window has its own toolbar. Ignore all but the first two buttons for now.
You will notice that the Node Views window has its own toolbar. Ignore all but the first two buttons for now.
The Node Views tabbed window lets you look at your nodes in two ways:
Both views are just that, “views” of the same network information.
NOTE: If a node isn’t showing up in the list, you can click the ![]() button in the main tool bar to refresh it.
button in the main tool bar to refresh it.
Click the ![]() Report View button.
Report View button.
You should see that two devices have been discovered and both have names of the form McastCounter. The directly connected “bridge” device (the SN132 SNAPstick) should be shown in blue, while the remote device is displayed in black. The nodes report in using a random response delay, so which node is named McastCounter and which is named McastCounter2 can vary.
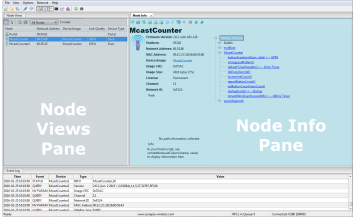 Double-clicking a node in one of the Node Views will display basic information about that node in the Node Info pane to the right Note that the node names are based on the names of the SNAPpy scripts loaded at the time of discovery, but with additional trailing digits (2, 3, 4, etc..) added to enforce uniqueness.
Since these nodes were pre-loaded with the “McastCounter.py” script, their names are of the form McastCounterX, where “X” is replaced by a number. If the nodes had been pre-loaded with some other script, then you would have seen entirely different base names.
 Connect the Green LED
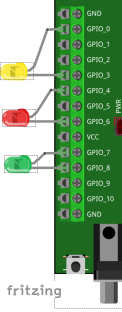 Repeat step 6 to connect the red LED to GPIO 6 (negative) and GPIO4. (It’s ok to bend the LED lead.)
It’s time to check on the quality of our work by testing the LEDs. We can use the new SNAPpy script we just uploaded to the node for this purpose.
All 3 LEDs should now be off. (We are ignoring the SN171 protoboard’s built-in yellow LED.)
NOTE: We are aware that Halloween comes before Christmas, but we used Christmas because we like Christmas better, mainly because of the presents and lack of “tricks.” If you’d like to extend the exercise by switching the order that they appear by all means modify the functions to your liking. We won’t mind, but we don’t get into the code until a later exercise. The management of Synapse Wireless has no official position on the matter of Christmas over Halloween, and just looks at us funny when we ask.
The SN171 protoboard is an easy way for us to connect components to the RF220 module. Securing the LEDs into the screw terminals is essentially the same as soldering them to pins on the RF220. The example scripts tell the node where to find the LEDs, and the Python functions you clicked in the Node Info pane are wirelessly controlling the LED behavior.
In our next example, we’ll demonstrate how the Python functions within the script can be triggered by the node they’re running on, or another node within the mesh.
| Problem | Action | Description |
|---|---|---|
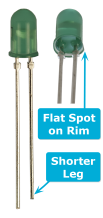
| One of the LEDs isn’t working | Verify the LEDs are installed correctly | LEDs have a positive and a negative lead. (The negative lead is the short one.) Make sure that the LEDs are in their proper numbered slots on the terminal block, and the negative and positive pins are in the correct slots. |
| The LEDs aren’t working, and neither are the lights on the SN171 Proto Board | Check the board power supply | Make sure it’s plugged into a power supply, (wall or battery) and the jumpers are set correctly for that power type. |
| When I uploaded the script, the node went away | Chances are you uploaded the HolidayLightShow script to the SN132 instead of the SN171. | GPIO_7 and GPIO_8 are also UART 1 TX/RX, so uploading a script that re-programs those pins as I/O (LED outputs) into your SN132 meant it couldn’t talk to Portal anymore. To fix this, carefully remove the RF220 module from the SN132, and swap it with the RF220 on the SN171. |
| I’m pretty sure the lights are saying something in Morse code | You’ve been trying to find a working IoT solution for a really long time | We understand. Keep reading. We’ll get you up and running with SNAP and your stress level will probably go down. We hope so at least. |